
I’ve had a lot of clients in my 19-year public relations career, but one of my toughest clients to date is my own kid.
We just wrapped another birthday party season for Miss Lennon and let’s just say the party for her classmates really challenged me.
Let’s recap our previous party themes (and I may have some blogging catch up to play):
1 - Flamingle
2 - Tea for Two
3 - Camp Lennon
4 - Strawberry Fields FOURever
5 - Frozen Fifth on Christmas in July
6 - Harry Potter
That brings us to the lucky seven. We invited a small group of family and friends over for a summer barbecue with a “Here Comes The Sun” theme - with some fun rainbow and sun decor. Of course, it rained right when the party was starting, but…then came the sun!


Like I said, Lennon is my toughest client. So after some brainstorming, I decided to hone in on the three fairies that watch over Aurora - Flora, Fauna, and Merryweather.

I found the perfect location very close to our house - a floral cottage - which reminded me so much of the “cottage” where Aurora, or Briar Rose as she was known, grew up!


I went with some minimal decor - some pastel green, pink, and blue balloon garland and hydrangea centerpieces featuring each fairy. I also added just a garland of flowers matching the fairies that I stocked up on during the after-Easter sales! The benefit of prepping almost a year in advance is scoping up deals when we spot them!
“Make It Pink! Oh no. Not Pink. Make it Blue!” - Wing Station
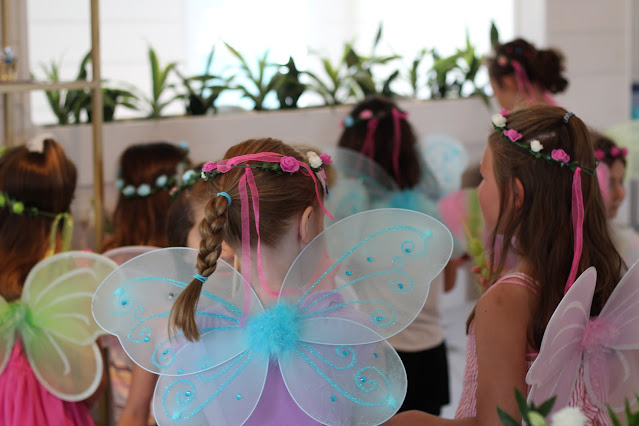
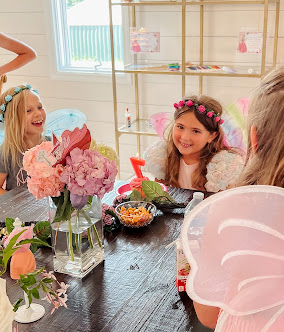
When guests arrived, they picked a crown egg. Inside was one of the three fairies and that determined what color wings the little “fairy” would receive (blue, pink, or green). We honestly had no arguments about the colors! I found both the crown eggs and wings on Amazon.
“I’ll get the wands!” - DIY Fairy Wands
For the first interactive craft, girls made wants. My helpers and I added glue to wooden star wands and the girls decorated them with sequins and gems. For a final touch, we added glitter!
“I know you, I walked with you once upon a dream. I know you, the gleam in your eyes is so familiar a gleam!” - Face Glitter
I probably could have gone a little bigger here with maybe a face painter, but we always wash that off a few minutes later. I found some face gems and glitter that are apparently very “festival-friendly,” so these girls were totally ready for Coachella by now.
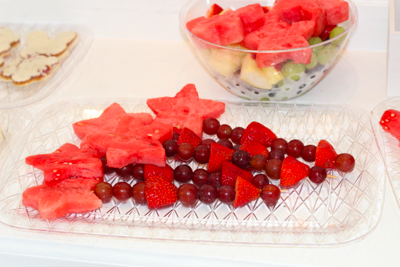
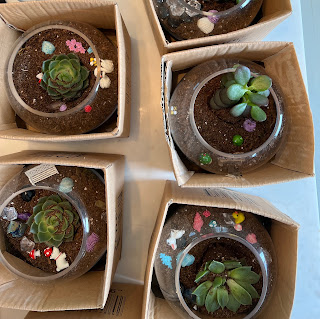
After some chicken nuggets, fruit wands, and butterfly and flower-shaped sandwiches, the girls were ready for the main event - Fairy Gardens.
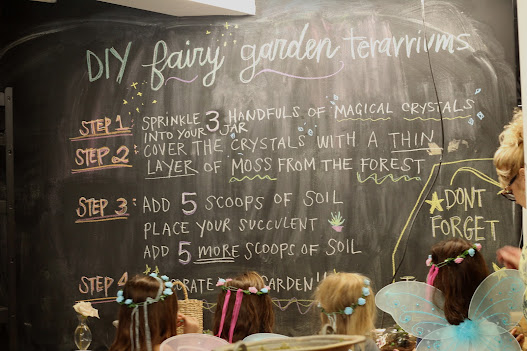
The floral cottage set up a DIY garden space. Each girl filled a glass bowl with magical gems, dirt, succulents, more dirt, and then some flair - and of course, fairies!
We had just enough time left for a DIY butterfly craft, cupcakes, and presents!
“Oh, you darlings. This is the happiest day of my life. Everything's so wonderful!”
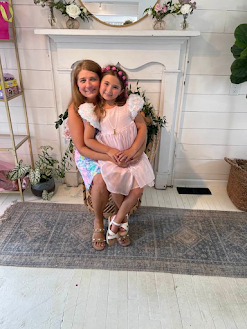
It was truly a magical day for Lennon! After a nap and some rest, I’m ready to take on next year’s challenge!
Read More
We just wrapped another birthday party season for Miss Lennon and let’s just say the party for her classmates really challenged me.
Let’s recap our previous party themes (and I may have some blogging catch up to play):
1 - Flamingle
2 - Tea for Two
3 - Camp Lennon
4 - Strawberry Fields FOURever
5 - Frozen Fifth on Christmas in July
6 - Harry Potter
That brings us to the lucky seven. We invited a small group of family and friends over for a summer barbecue with a “Here Comes The Sun” theme - with some fun rainbow and sun decor. Of course, it rained right when the party was starting, but…then came the sun!


For her classmate party, Lennon decided more than a year ago that it would be “Aurora” theme. Also known as Sleeping Beauty. While a slumber party would have been the natural choice, due to the pandemic and maybe age, these girls weren’t ready for an actual slumber party.
Like I said, Lennon is my toughest client. So after some brainstorming, I decided to hone in on the three fairies that watch over Aurora - Flora, Fauna, and Merryweather.
I found the perfect location very close to our house - a floral cottage - which reminded me so much of the “cottage” where Aurora, or Briar Rose as she was known, grew up!


I went with some minimal decor - some pastel green, pink, and blue balloon garland and hydrangea centerpieces featuring each fairy. I also added just a garland of flowers matching the fairies that I stocked up on during the after-Easter sales! The benefit of prepping almost a year in advance is scoping up deals when we spot them!

When guests arrived, they picked a crown egg. Inside was one of the three fairies and that determined what color wings the little “fairy” would receive (blue, pink, or green). We honestly had no arguments about the colors! I found both the crown eggs and wings on Amazon.

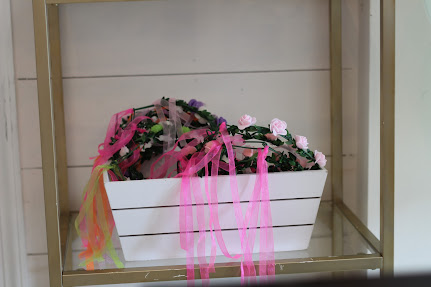
“A crown to wear in grace and beauty, as is thy right and royal duty” - Flower Crowns
Next, the girls selected a flower crown. Amazon for the win again, and I purchased this pack of crowns.
Next, the girls selected a flower crown. Amazon for the win again, and I purchased this pack of crowns.
“I’ll get the wands!” - DIY Fairy Wands
For the first interactive craft, girls made wants. My helpers and I added glue to wooden star wands and the girls decorated them with sequins and gems. For a final touch, we added glitter!
“I know you, I walked with you once upon a dream. I know you, the gleam in your eyes is so familiar a gleam!” - Face Glitter
I probably could have gone a little bigger here with maybe a face painter, but we always wash that off a few minutes later. I found some face gems and glitter that are apparently very “festival-friendly,” so these girls were totally ready for Coachella by now.
After some chicken nuggets, fruit wands, and butterfly and flower-shaped sandwiches, the girls were ready for the main event - Fairy Gardens.

The floral cottage set up a DIY garden space. Each girl filled a glass bowl with magical gems, dirt, succulents, more dirt, and then some flair - and of course, fairies!

We had just enough time left for a DIY butterfly craft, cupcakes, and presents!

“Oh, you darlings. This is the happiest day of my life. Everything's so wonderful!”
It was truly a magical day for Lennon! After a nap and some rest, I’m ready to take on next year’s challenge!


